Thursday, September 27, 2007

Hummus

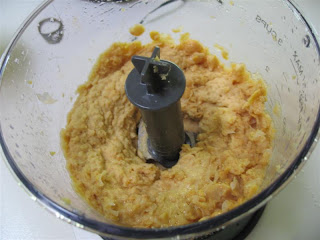
I got a new food processor for my birthday and so tried to inaugurate it with hummus. I love the Israeli style hummus (pronounced ch-oo-moos), which is much creamier and richer and less grainy than the hummus available in most stores. I failed, however, in making it and instead made a more Western-style hummus. Still tasty but not my cup of dip.
Prepare:
-1 can of chick peas, drained and rinsed (I should have used the fresh, maybe, and also removed the peels... but I didn't)
-1/3 cup tahini
-Several cloves of garlic
-Some olive oil
-Juice of 1/2-1 whole lemon, pending your taste
-1/2-1 tsp pending on your taste of the following: cumin, paprika, black pepper, salt
Cook:
-Roast the garlic in the peel in a toaster oven for about 20 minutes or until soft
-Process the chick peas first

-Add garlic, oil, lemon juice, and spices
-Add oil/water until reaches desirable consistency and flavor
-Garnish with some olive oil, parsley, and pine nuts, and enjoy with fresh pita, bread, or crackers

Pad Thai

When I've been to Bangkok, the main delight was eating the astoundingly cheap yet amazingly delicious pad thai that the locals whip up on their mobile woks along the street. I've had pad thai at restaurants of various quality, price and location in the world and have never found a comparable pad thai. I wanted desperately to recreate that dish. What I made wasn't exactly the same but still turned out, if I say so myself, pretty delicious. I found the recipe at this website that specializes in Thai food, made a few modifications, and had it for dinner. This makes about 4 servings.
Prepare:
-Chop 1 small onion
-Crush 4 cloves garlic
-Get a 1 lb/400 gm package of dried rice noodles (I used the flat kind)
-Chop up a small piece of pork
-Chop 1/2 a cup of firm tofu-Ready 4 tbsp sugar, 3 tbsp fish sauce, ~4 tbsp vinegar, and 1 tsp chili powder
-Ready 3 eggs
-Chop up a handful of green onion and bean sprouts
-Crush 1/2 cup dry roasted peanuts
Cook:
-Soak the noodles in water for about 5 minutes (this is what I did per the recipe and found this was not enough, next time I'd half cook them in boiling water!)
-In a large wok, fry the onion and garlic for a couple minutes with a couple tbsp of olive oil on medium heat, then add the noodles-Fry for 5 minutes or so, or until noodles are well cooked, then add the sugar, fish sauce, vinegar and chili powder. Mix for another minute or so and then put aside (it said in the recipe, put to the side of the wok but I think you'd need a gigantic wok to be able to do that, so I just put it in a bowl)-In the same wok with added olive oil, fry pork and tofu for about 5 minutes or until pork is not pink on the outside-Toss the pork into the bowl, mix well
-Add a bit more oil to the wok and break the 3 eggs into it, scramble it a bit, and fry for 2-4 minutes (pending on how cooked you like your eggs)-Then pour the noodles and pork back in and mix well, turning off the heat
-Add bean sprouts and green onion
-Serve with crushed peanuts on the side

Tips:
-I was very pleased with how this turned out. It was a bit sweet, not salty, not too vinegary (which is great since I don't like vinegar, usually), but not spicy. Next time I'd fry a chili pepper or two with the onion and garlic
-The noodles were good but, due to soaking without boiling at all, a bit undercooked. They were difficult to fry, as well. Next time I might try with a different noodle
-The recipe called for salted Chinese radish but I didn't have that so didn't use it, if you have it or love it, you should throw it in

Granola

I love granola but getting the good stuff is pretty pricey. I set about trying to make it myself, to see if that could make it any cheaper. It turned out delicious but, unfortunately, not much cheaper. I got the recipe from my friend Bowen, to whom I dedicate this post (but not this granola, unfortunately, as it has nuts and would kill her). I modified it a bit so if it doesn't turn out to your liking, blame me and not her. The most arduous part of the granola is getting all the ingredients... after that, it's too easy. This makes about 10 good size bowls.
Gather:
-3 cups of oats
-1 cup each sunflower and pumpkin seeds
-1/2 cup each walnuts, pecans, almonds, and sesame seeds
-1/4 cup flaxseed (linseed)
-1/2 cup shredded coconut
-1/4 cup oil (I used olive)
-5 tbsp honey
-1 tbsp blackcurrant jam (use any dark, sweet fruit-full jam)
-2 tbsp warm water
-1/2 tsp salt
-~1 tsp each cinnamon and vanilla (more or less pending on your tastes)
Cook:
-Mix it all in a large pot and cook on medium heat for about 10 minutes or less-Place on a greased baking pan and bake 275F/160C for about 50-70 minutes (it should be crunchy and tasty)-Store in an airtight container. Tips:
-You can add a bit of brown sugar if you like a sweeter cereal
-The original recipe called for maple syrup instead of honey, but as I didn't have it I didn't use it... I bet it would be delicious if you used it
-Dried fruit (raisins, currants, cranberries, dates, etc) go fantastic with granola but, I read online, should be added individually with your bowl because if it's mixed in with the granola, it causes it to moisten a bit
-Enjoy in a big bowl with some fresh fruit, your favorite milk (I think soy milk + granola = heaven), and a bit of yogurt and thank me later

Chocolate Date Muffins

I found this recipe on the back of the package of dried dates that I had been munching on. Seemed easy and tasty enough, so I scaled it down for 6 muffins, made a bit more changes, and went to town.
Prepare:
-Chop up ~1/2 cup of dates
-Ready 1/2 cup of water for boiling
-Chop 50g (a little less than half a cup) of butter or margarine
-1/4 cup castor sugar
-1 tbsp chopped almonds
-1 egg, beaten
-1/2 tsp vanilla
-1/4 tsp baking soda mixed in 1/4 cup of milk
-1 cup self-raising flour (I didn't have self raising so used this convenient substitution: 1 cup self raising = 7/8 cup regular + 1 1/2 tsp baking powder + 1/2 tsp salt) mixed with 1/4 cup cocoa
-1/2 cup or less chocolate chips
Cook:
-Preheat oven to 210C or 410F (I know, it's hot, but it worked)
-Pour boiling water over dates in a bowl, mix and crush till melted
-Slowly add butter-Wait till butter melts, then add everything else except for the chocolate chips and mix very well
-Fold in chocolate chips-Pour batter into greased muffin tray-Put try in oven, baking for about 18-20 minutes, or until toothpick test works outTips:
-These were great, I don't know if I'd change anything... maybe substitute pecans for the almonds and also use chocolate chunks instead of chocolate chips
-Eat them warm - they're great that way

Sunday, September 16, 2007

Spicy Ginger Chicken Stir Fry

I've had this bottle of 'ginger refresher' sitting on my shelf for a while. It's basically a cordial, a syrup, that you mix with soda water to get very tasty ginger ale, or as they call it in Australia, ginger beer. The syrup is very strong and not too sweet and every time I helped myself to a drink I wondered if that syrup could be used as a marinade/sauce for cooking. So I tried.
Prepare:
-Chop stir fry vegetables. I used: cauliflower, broccoli, onion, pepper, hot pepper, zucchini, carrot, green beans, green onion, bok choy-Chop chicken
-Crush several cloves garlic and some fresh ginger
-Find some ginger ale syrup
Cook:
-Cook some rice, separately
-Heat a large wok, medium heat, and add some olive oil
-Throw in the chicken with half the crushed garlic and half the onions
-Add some salt and pepper
-Cook for about 3-5 minutes or until there's no pink on the outside of the chicken-Add the rest of the vegetables (include the other half of onions and garlic... don't include the green onion and bok choy) and turn up heat to medium-high
-Stirring constantly, add Asian sauces and spices (I did soy sauce, sesame oil, oyster sauce, Korean pepper powder and another Korean thing) and add about 2 tbsp of the ginger syrup and the crushed ginger
-Continue stirring and cooking for about 7 minutes, adding another tbsp of ginger syrup, until vegetables are reduced and chicken is cooked through. Add bok choy and green onion
-Turn off heat, stirring for 5 more minutes until greens reduce a bit-Serve with rice
Tips:
-Have everything ready before you start cooking, as it cooks quickly and stirring a lot is optimal to have the taste homogeneous and prevent sticking to the wok
-Adding an egg after the veggies have been cooking for a couple minutes could thicken it up a bit and add some more protein/taste
-If not saucy enough, add 1/4-1/2 cup of water with a bit of stock powder and let simmer for 5 minutes. This should be done after the veggies have cooked in the spices for a bit

Thursday, September 13, 2007

Gluten-Free Carrot Cake with Cream Cheese Icing

I have always loved carrot cake and was inspired to make it when my brother told me about his recent success with a batch. In order to make it gluten-free and keep it delicious, I culled ideas from these 3 different recipes: 1, 2, and 3. I was worried that it wouldn't turn out well, especially when I used olive oil since that's all I had, but the cake turned out to be very moist and delicious. The batter was enough to make one cake plus 6 muffins. What I did was bake the cake the night before serving it, then refrigerate it over night and the following day make the icing, ice the cake and then serve it cool. It turned out excellent and all my friends were pleased with it. It was one of the more involved things I've made: I'd say about 30 min of prep, 1 hr of cooking for the cake, with another 10 min for the icing. It makes for a good 50th recipe, for sure.
Prepare Cake:
-Grate 3 cups worth of carrots (this was about 4-5 carrots, pending on the size)-In a large bowl, mix 2 cups gluten-free flour, 1 cup brown sugar, 1 cup white sugar, and 1 tsp baking powder
-Beat 3 large eggs in a bowl
-Chop about a handful of dried dates into small pieces-Mix the carrots, dates, and eggs with the flour, adding 1 cup of cooking oil (I used 1/4 canola, 3/4th olive)
-Add 1 tbsp of vanilla essence and 1 tbsp ground cinnamon-Pour into lightly greased cake/loaf/muffin pan, leaving room at the top since it rises a significant amountCook:
-Preheat oven to 375F/180C and bake for about 50 minutes for the cake, 30 minutes for the muffins
-Be sure to check with a toothpick! The outside should be firm yet depressible and the inside should be moist but not wet-Let cool on a drying rack and refrigerate if not eating soon

Prepare Icing:
-Let 1/2-1 cup butter and 1 8oz/225g package of cream cheese soften-Chop/crush 1/2 cup pecans and 1/2 cup walnuts
-Mix the butter, cream cheese, nuts, 1 tsp vanilla, and about a cup of icing sugar (if not sweet enough, add more)-Spread atop cake
Tips:
-This cake was very flavorful as it was; other things you might want to add would be nutmeg, cloves, ginger, or orange zest. Also, you could substitute/add to the dates with raisins, craisins, dried apricots, candied ginger, etc.
-The batter was quite runny and pour-able (like beaten eggs). That being said, if it's too runny, add a bit more flour
-With the muffins, you can slice in half, put icing in the middle, and piece back together
-I was worried about the olive oil as the batter had a distinctive olive-oily taste, but there was none after cooking. Still, in the future, I'd maybe use 1/2 olive oil and 1/2 something else. Alternatively, I may use 1/2 oil and 1/2 applesauce for a healthier and still-moister cake
-Some recipes I've seen have called for 1 cup of drained pineapple chunks to be used instead of1 cup of carrots - I did not do this but I bet it would contribute well to the moistness as well as add a bit of tart to the cake. Also, I think that maybe doing half carrot and half zucchini would work nicely
-For the icing, what I did was place the butter and cream cheese in the mixing bowl and set that atop the oven while baking something - they slowly melted and made the blending a lot easier.

Gluten-Free Cheese Balls

This was another dish that I made so my Coeliac's teacher could eat without intestinal problems: this food is a pretty quick and easy savory snack that has an interesting texture and pretty unimpeachable taste. The recipe that I used claims that these balls originate in Brazil and are called 'Pao de Quiejo'.
Prepare:
-In a saucepan on medium heat, heat 1/4 cup olive oil and 1 cup milk, stirring constantly with a wooden spoon, until it starts boiling-Remove from heat, add 1 1/4 cup gluten-free flour, mix and set aside for 5 minutes-Mix in 1 egg, 1/2 cup grated Parmesan, and whatever flavoring you would like: I used garlic salt, dried basil, and Korean pepper powderCook:
-Preheat oven to 375F/180C
-Separate the dough into 12 balls, place evenly on a sheet of baking paper on a pan-Bake for ~20 minutes, flip over (bottom should be browning), turn down heat a bit and then bake around 10 minutes more. Make sure to do the toothpick testTips:
-These are very sticky when raw! You may want to flour your hands ahead of time - I was able to spoon the balls out but it wasn't the most pleasant thing ever

Monday, September 10, 2007

Sweet Potato Oven Fries

I love sweet potatoes and am always looking to eat them. I'm happy to simply steam them and chomp down, but decided to go for something a little more civilized this evening.
Prepare:
-Slice sweet potato length wise, into pieces about the size of a finger. Peel if you'd like (I like the peel and it's a good source of fiber, so I leave it on)
-Place in a plastic bag with a bit of olive oil... start off with 1 tbsp-Seal and shake up well, till it appears that all the surfaces of the potatoes are coated. Add more oil if necessary
-Into the bag, add any spices that you like: I added cumin, Korean pepper powder, pico de gallo, and garlic salt (1/2-1 tbsp each) - enough so it's well coated-Lay out on a oven-safe pan, with a raised edge
Cook:
-Preheat oven to 375F/180C
-Cook for about 20 minutes, take out and flip the pieces over, cook for another 10-15 minutes or until potato is tenderTips:
-This delicious dish would be a great side or light meal. You can substitute/add regular potato, yams, or pumpkin even in the flavoring
-I also included in the roast some garlic (still in the peels) and onion, because I love roasted garlic and onion too much to not include them in a roast
-You can adjust your spices pending on what you like: cinnamon and brown sugar for a more "traditional" sweet potato taste; turmeric and coriander for an Indianesque flavor; sea salt and cracked black pepper for a neutral pleasure
-I know it may seem wasteful to use a Ziploc bag for this, but I used one that I had previously used for sandwiches - recycle!

Sunday, September 9, 2007

Fat Chewy Chocolate Chip Cookie

I found this recipe off allrecipes, like so many other good ones, based on its impressive rating and reviews. Many were heralding it as the "most amazing cookie ever" and "the kind of cookie you get in a bakery but can never make at home". I copied it as written on the website and prayed for a worthy product. It was very delicious - nicely crunchy on the outside, but good chewyness on the inside. Not the most amazing cookie I've ever had, but very very delicious nonetheless.
Prepare:
-Melt 170g (3/4 cup) of unsalted butter (I used salted and didn't add the salt later on)
-Cream1 cup brown sugar, 1/2 cup white sugar into the bowl with the butter -In a small bowl, beat 1 egg and an additional yolk, mixing in 1tbsp vanilla essence-In a large bowl, sift 2 cup plain or all-purpose flour with 1/2tsp of baking soda and 1/2tsp of salt (skip if used salted butter)
-Mix the 3 bowls together... not too much, though, just until more or less blended
-Fold in as many chocolate chips as you'd like-Refrigerate for about 40 minutes
Cook:
-Roll dough into balls... using 1/4cup measuring spoon gets you a nice big cookie
-Space evenly on a baking pan lined with ungreased baking paper (this is important)
-Bake at 350F/160C for about 15-20 minutes, or until outsides start to turn brown but inside is still soft
-Let sit outside, on cookie sheet, for a couple minutes to finish cooling. Eat!Tips:
-I made these at a friend's house with aluminum foil instead of baking paper and it turned out plain wrong! Use baking paper
-The time is weird... according to the recipe, it called for 15 minutes or less, but mine took closer to 25 or 30 minutes to cook. It depends on the size of the cookie and the efficiency of your oven, I suppose
-You can make the batch, and separate it into rolls (wrap in baking paper and then cling wrap/plastic bag) for freezing - then when you want a cookie or two, just cut off from the loaf and bake in a toaster oven!-Substitute chocolate chips for chunks, or any other flavor (butterscotch, white, peanut butter) chips, as per desire and availability