Wednesday, September 24, 2008

Fig Brownies

This is a pretty simple and highly delicious recipe for brownies. The original recipe called for cashews but all I had were figs and, lemme tell you, it turned our very delicious.

Prepare:
-Mix 200g dark chocolate (broken up) with 175g unsalted butter in a bowl
-Melt in a microwave (medium heat for several minutes, stirring every now and then) or over a pot of boiling water and then leave aside to cool
-Whisk 2 eggs and 1 cup of sugar (brown makes for a moister brownie) for about 5 minutes until pale and fluffy-Add the chocolate butter mixture-Sift 1 cup flour and 1/3 cup of cocoa powder into the large bowl and mix well-Roughly chop 100g of dark chocolate and a handful of dried figs-Fold into the mix
Cook:
-Preheat oven to 160C/320F
-Pour into a shallow brownie tin, lined with baking paper
-Bake for about 30-35 minutes. Top should be firm but not too hard, as these will set when left to cool
-Enjoy with some fresh fruit or an icing

Tips:
-These are pretty quick to make and very delicious. You can use a sour-cream based icing but I find these sweet enough on their own to not need it
-You could use many different things instead of the fig: pistachios, cashews, almonds, dates, apricots, dried cranberries, etc.

Saturday, August 23, 2008

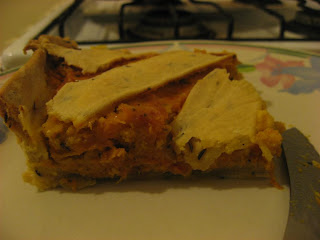
Pecorino and Pumpkin Pie

I bought a pumpkin and was browsing recipes and found an interesting one for a savoury pie thing. I modified it quite a bit as the original recipe looked fairly bland.

Prepare dough:
-Sift together 3 cups of flour with 1 tsp sea salt and 1 tsp rosemary
-Mix together 1/2 cup of extra-virgin olive oil, 1/3 ml of cold water and 1 egg
-Make a volcano out of the flour and add the liquid in the middle. Beat with a fork to form a dough, switching to hands once it gets too tough
-Knead for a couple minutes (add a bit of water at a time if it gets too grainy) until smooth
-Put in a plastic bag and place in the fridge for a couple hours
-Roll the dough to about 2mm thickness (pretty thin)
-Cut 2/3rds of it and mold it to fit a greased 6 1/4in x 10 1/2in baking sheet-The other 1/3rd of the dough should be cut into strips
-Place in the fridge for half an hour

Prepare filling:
-Preheat oven to 200C/400F
-Dice pumpkin, about 2 or 3 cups worth
-Coat in oil and a bit of salt and put in a roasting pan and into the oven
-About 20 minutes afterward, mix up the pumpkin and place 4 cloves unpeeled garlic in the pan
-Beat 3 eggs in a large bowl
-Grate about 2/3 cup of pecorino cheese into the egg-Once pumpkin is soft, remove from oven
-In the bowl, mash pumpkin and garlic (removed from skin)-Add a tsp each of sea salt, crushed black pepper, nutmeg, and basil

Cook:
-Place the filling into to the dough, smoothing out
-Place the strips diagonally across the pie-Bake for an hour or a bit more until the pastry is crisp and goldenTips:
-This made more than I wanted, so I assembled a whole small pie and put it in the freezer and baked it a week later, happily
-It was tasty but seemed to lack something that I couldn't put my finger on. Everyone else thought it was really tasty. I found the whatever-lacking was fixed by eating the pie with either a fresh, watery vegetable such as radish or cucumber or by spreading fresh pesto or schug on top.

Eggplant Lasagna

I bought a bunch of eggplants in the market and wanted to put them to good use. I scoured the internet for ideas for how to make lasagna and found a good recipe for the cheese mixture. I also found a recipe for homemade pasta and embarked on the mission. It was a bit labour-intensive but so tasty and well worth it for the thanks from my friends.

Prepare lasagna sheets:
-On a clean, wide surface make a mound of 3 cups of flour with a dip in the middle (volcano)
-Crack an egg into the middle and beat with a fork within the volcano, picking up flour on the way; repeat with 2 more eggs for a total of 3
-Once you can't beat anymore with the fork, knead with your hands for a while - at least 5 minutes
-Set aside for about 30 minutes-On floured surface, roll (and roll and roll). It will most likely be easier to divide the dough in half and roll that way, otherwise it takes up too much space.
-Once it's flat enough to almost be transparent, cut into rectangular sheets-Get the widest slightly-deep pan you have and fill it an inch or two with water and set to boil
-Cook the sheets for a minute or two in the boiling water and then place aside to drain

Prepare eggplant:
-Preheat oven to about 200C/400F
-Cut a couple eggplants into 1/2inch thick slices.
-Place on a tray and coat with olive or canola oil
-Roast for about 5 or 10 minutes, then flip over and roast again

Prepare cheeses:
-Cube about 2 1/2 cups of fresh mozzarella, 1 cup provolone, 2 cups ricotta, 1 cup grated parmesan
-Mix in a large bowl with 2 or 3 cloves of minced garlic and an egg to hold it together

Prepare sauce:
-Make or buy a tomato sauce. I have a couple recipes on the site. I just made a basic one: sautee onion and garlic in olive oil with a bit of balsamic vinagrette. Add 2 or 3 tins of peeled tomatoes, 1 fresh tomato, some bay leaves, 1 tsp of stock powder, 1 tbsp tomato/chili paste, 1 tsp oregano, a bit of honey and some salt and pepper. Let simmer for about an hour (so start this before the pasta sheets)

Prepare lasagna:
-Line the bottom of a deep baking dish with eggplant
-Pour some sauce to cover eggplant
-Add the layer of cheese
-Repeat until everything is used up, trying to end with sauce on top. On the top place large pieces of mozarella
Cook lasagna:
-In an oven preheat to about 190C/380F, bake for about 30 or 40 minutes
-Take out and let cool for about 10 minutes so you don't burn the roof of your mouth
-Enjoy

Tips:
-I know it's labour-intensive. I made everything from scratch and from start to eating took less than 3 hours. But it was 3 full hours. Timewise, the best way to do this is to start the sauce, then make the pasta dough and roll it out; once it's flat and cut do the eggplant and while the eggplant is in the oven, cook the eggplant sheets in the boiling water. This way the oven can still be on once the eggplant is taken out of the oven and the lasagna can go right in.
-Rolling is pretty hard (especially with a wine bottle!). The best strategy, I find, is to roll a bit and then flip the dough over and rotate 1/4 of a circle clockwise. Once it gets pretty flat, it's harder to roll and you have to kind of press down as you slide the roller. Make sure stretch your fingers every now and then.
-This recipe for pasta is the same as any kind of pasta, so you can use it for any shape you'd like etc (I had more sheets than other material and so cut it into fettuccine and froze it)
-I don't peel eggplants because I like the texture and taste of the skin. I also have stopped salting them before hand since the newer varieties aren't as bitter and don't need that done

Lentil Burgers

Last week was Ekka holiday. It is some random holiday whose function or reason is unimportant. What is important, however, is that BBQ was involved. I wanted to give a go on making veggie burgers, using lentils, for all my vegetarian friends. I got a couple ideas around the internet and the results were really quite tasty.

Prepare:
-Soak 1 1/2 cups of dried green lentils in water (more than cover) for several hours/overnight
-Change water and simmer for about an hour or until the lentils are soft. Drain and set aside to cool-Mix about 1/2 cup bread crumbs with a tablespoon of cumin seeds and toast in a pan on low heat for about 5 minutes
-Dice half an onion
-In a food processor, mince a couple cloves of garlic and a couple hot chili peppers with a bit of coarse salt
-Add the lentils to the processor and 2 eggs and pulse until completely mixed
-Add 1tsp honey and 1 tsp soy sauce
-Mix in bread crumbs/cumin seed mixture and the onion
-Check consistency - if too fluid (they should be able to hold together fairly well) then add more breadcrumbs
-Make several medium-sized patties (about 8 or 9, I got)

Cook:
-On a hot grill with some oil, place patties and cook for about 7 or 8 minutes on either side until brown and crispy

Tips:
-These were really good, even with non-vegetarians. They do look pretty nasty, though, so try to hide them, uncooked, from people.
-Even with a decent amount of breadcrumbs, they still were a bit viscous. This was no problem once thrown on the grill, though.
-They're totally fine to taste before BBQing, so make sure to check spiciness/saltiness etc (I added some extra cayenne pepper to a batch and it was great)
-It would be good if you made a thicker patty and then cut in the middle and put tomato or avocado or cheese or something
-Freezes well


Wednesday, July 2, 2008

Sweet Pistachio Cake

Perusing the Weekend Australian magazine for the recipes, as per usual, I came across this interesting pistachio cake. What made it interesting was that all it had was pistachio, egg, sugar, and a bit of lemon juice. Since my girlfriend loves pistachio, I thought I'd give it a go. It turned out very tasty but really really sweet. More of a meringue than a cake, necessarily. I will give the recipe for how I think it should be done next time, so it's not too sweet. Also, contrary to a lot of baked goods, this should not be eaten just out of the oven. I found it MUCH better after spending overnight in the fridge.
Prepare Syrup:
-Mix about 1 cup of sugar with 180ml of water in a pot on high heat, simmer until sugar has dissolved
-Mix in about 1 tbsp lemon juice and 2 tsp (if you've got it) rosewater
-Set aside to cool

Prepare Cake:
-Coarsely chop 50g of unsalted pistachios
-Separate 5 eggs
-In a food processor with 'whipping' attachment, or using an electric beater, whisk together the egg yolks with 200g caster (icing) sugar

-In a food processor, grind 200gm (~1/2lb, sorry - no cups) of unsalted and unshelled pistachios
-Mix the pistachio meal with the whipped sugar and egg yolk-Now beat the egg whites until they turn stuff-Fold the egg-white into the pistachio mixture, not too much (don't blend it together completely)
-Put in a greased round cake tin, lined with baking paper-On top, spread the chopped pistachios
Cook:
-Preheat oven to 350F/180C
-Bake for about 45min-1 hr until nice and golden and firm on top upon pressing
-Poke about 15 holes around the cake and pour in half the syrup
-Taste a bit of the inside and if not sweet enough, add more syrup (make sure you do this and not dump all the syrup in!)
-Set the cake aside for a couple hours or refrigerate overnight and enjoy later with fresh strawberries
Tips:
-As I mentioned before, I changed the recipe to make it less sweet. You could just make half as much syrup or use the same amount of water but less sugar if you want the cake to be moist and gooey on the inside.
-I didn't have rosewater so I used the juice from one mandarin but I could hardly taste it. I would like to try it with rosewater next time.
-Make sure you clean the beater/whipping device in between whisking the egg yolk and the egg white, as fat from egg yolk changes the texture of the egg white firmness, supposedly.
-I didn't line the cake tin with baking paper and it SUCKED to clean. Please do it, you'll thank me later.

Thursday, June 26, 2008

Refried Beans

Refried beans always seemed like such an ironic luxury to me. Like donuts or potato chips, it was always something that was cheap and "common", yet I was never really able to eat, especially not as much as I'd like. Seen as unhealthy or just unusual to order on the the occasions I'd eat Mexican food growing up, I mostly avoided it. Well I've been hankering for it, indeed, and now that I'm an adult, I can eat anything I want! Googling and checking metafilter eventually got me this recipe. The secret ingredient is, incidentally, salt. Seriously, you need a lot of salt for this - it's not just me, I swear.
Prepare:
-Soak 1 cup of dried beans overnight in water
-Quarter 1 small onion and dice half an onion
-Chop about 3 lengths of bacon
-Mince 3 cloves of garlic
-Ready bay leaves, salt, and whole peppercorn

Cook:
-Place soaked beans in a medium pot and cover with water plus add another inch and a half of water. Put in quartered onion, a couple bay leaves, a tablespoon of peppercorns, and 2 tsp of salt (the water should taste like seawater)

-Simmer for an hour or until beans are ready (they should taste edible but still a bit firm; if you take a couple out of the pot and blow on them, the skin should peel). Drain the beans but reserve about 1/2cup of the water-Meanwhile, fry bacon on medium heat in a large pan until completely crispy and all the fat is in the pan. Remove the bacon and set aside
-Fry the onion in the bacon fat until it starts getting translucent and then add the garlic
-Add the beans and a bit of the water onto the pan and start mashing, add more water to reach desired consistency.-Enjoy on its own or in a burrito

Tips:
-Some of the recipes called for adding "salt pork" into the pot when cooking the beans. I think this is just a thick, salted and cured pork to add to the taste of the beans. I don't have it so I didn't use it
-I made this a second time and when cooking the beans in the pan, added about a tsp of pico de gallo and a tsp of cumin to give it a bit more flavor and it came out quite tasty.
-This can also be done with tinned beans, just add them at the same step as the cooked beans.

Saturday, May 31, 2008

Shortbread Date Fingers

This recipe I picked up from a Brisbane news magazine and adjusted it to taste. I was happy to use dried dates, as they are a very cheap dried fruit with an exquisite taste. This bar turned out very tasty and I got lots of kudos for it. It's a bit of work with some prep but worth it in the end.
Prepare Base:
-Sift together 80 g (3/4 cup) caster or fine sugar, 1 1/2 cup white flour, 1/2 cup rice flour (or extra white flour if you don't have it) in a large bowl
-Add in about 1 cup of chopped butter and a tbsp of oil and mix until you get fine breadcrumb-like objects
-Add in 15ml cold water and 1 egg yolk
-Knead until it forms a dough and then freeze for 20 min or refrigerate for 1 hr
-After it's cool, roll it out to the size of your deep baking dish (mine was 12''/30 cm by 9''/24cm or something) and then refrigerate for another 20 minutes-Place on deep cooking tray lined with baking paper and bake in oven that's been preheated to 175C/350F for about 25 minutes or until it starts turning brown
Prepare Filling:
-While the base is baking, place about 400gm (almost 1lb, maybe 3 cups) of dried dates in a small pot
-Cover with water
-Add the zest of 1 orange, 1 tsp vanilla, 1 tsp cinnamon, and a splash of vegetable oil-Simmer for 15 minutes or until it turns to mushPrepare Topping:
-Mix 425 g or ~ 3 cups of self-raising flour with 2 cups caster sugar, 1 tsp cinnamon and 3/4 tsp of baking powder
-Mix in 1 1/2 cups unsalted chopped butter, with some oil, until coarse bread crumbs are formed
Cook:
-Spread the date-filling onto the base and sprinkle the topping crumbs over it
-Bake at 175C/350F for about 30 minutes or until it starts to get a bit golden on top. Check halfway and make sure it's firm - if not, sprinkle some more oil on top.
-Dust with powdered sugar on top and enjoy

Tips:
-This recipe called for a lot of butter. I used significantly less but substituted a fair amount of canola oil, olive oil and some egg white. It was from a pouring bottle and thus I do not know the exact amounts. Adding another egg or using applesauce and stuff would be a great way to cut out on the fattiness (though the fat is what makes shortbread short).
-The way I presented it was how I did it, but next time around I'd make the base and topping at the same time to cut down on time. Only for the end bit (mixing water and egg yolk) would I separate it. I'd also cut down on the sugar a bit as it was a tad sweet - otherwise, it was mighty tasty